Source App: Email Parsing + Target App: Google Sheet
This topic describe the procedure on how to create a hiring workflow using source app as email parsing and target app as google sheet.
- Once you click Create New Workflow in section Hiring Flow
Dashboard, fill the following fields as follows:
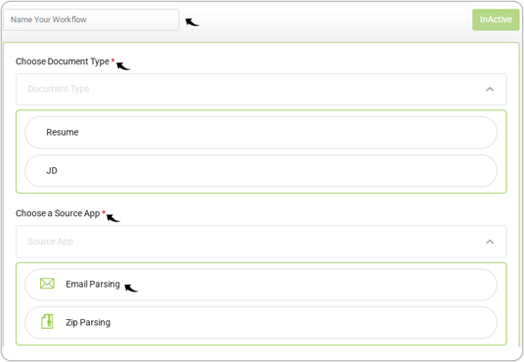
- Name Your Workflow: Enter the name for your workflow. The System would assign a name to the workflow if this field left blank.
- Choose Document Type: Choose either Resume or JD from the drop-down as necessary.
- Choose a Source App: Choose either Email Parsing or
Zip Parsing from the drop-down as necessary. In this case, select
Email Parsing.
- Once Email Parsing is selected in the above step, do as follows
for the following fields and click Continue.
- Choose Your Email account: Enter your email account.Note: One email account can be used only once to create a workflow. For each workflow, a unique email account is necessary. You can add multiple emails separated by comma or semi-colon.
- Choose Email Process Type: Select the email process type from the
drop-down.
- Attachment: If you select Attachment, then candidatezip will search resume/JD from the attachment of email only.
- Body: If you select Body, then candidatezip will search resume/JD from the email body only.
- Both: If you select Both, then candidatezip will
search resume/JD from the email body and attachment both.

- Choose Your Email account: Enter your email account.
- Set the forward setting for your emails from where you want to send resume/JD to:
- resumeparsing@candidatezip.com for the resume
- jdparsing@candidatezip.com for the JD
Note:- To automate the forwarding of emails containing resumes to resumeparsing@candidatezip.com, you can update the email setting to forward a copy of all your emails to resumeparsing@candidatezip.com. See the Gmail setting on how to Automatically forward Gmail messages to another account. Also, if you want to forward emails containing only the resume, see how you can Create rules to filter your email.

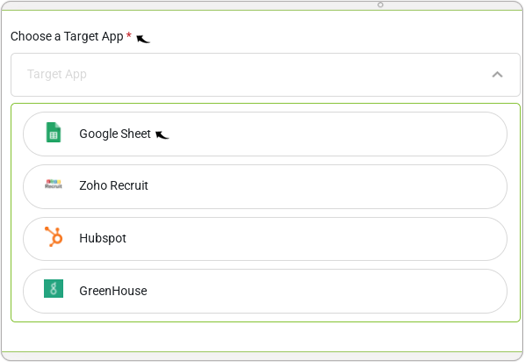
- Select Google Sheet as a target app for Choose a Target App
field.
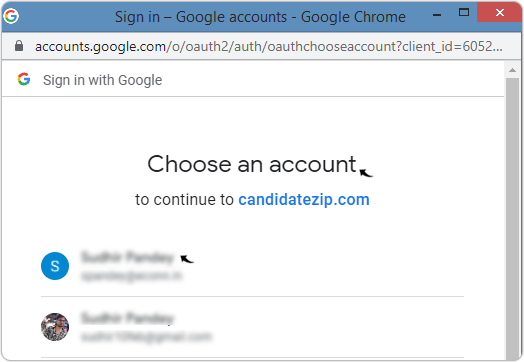
- On Choose Your Goggle Sheet account field, click Add New
Account.Note: Add existing Gmail account as necessary.

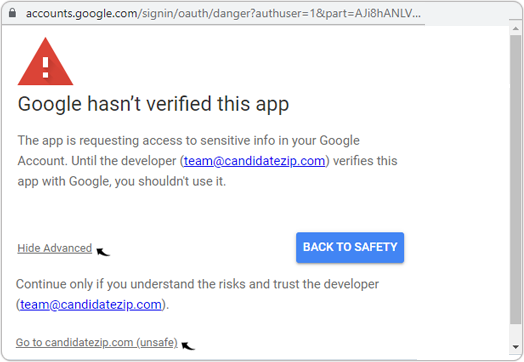
- On Sign in with Google pop-up, click on your Gmail account.
- On google alert, click Advanced/Hide Advanced and Go to candidatezp.com
(unsafe).
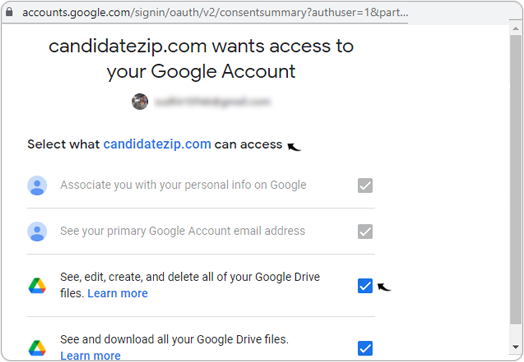
- Select the Gmail service checkboxes that you want to give access to
candidatezip.
- Once the Gmail account is selected in the above step, make the selection
for the following fields:
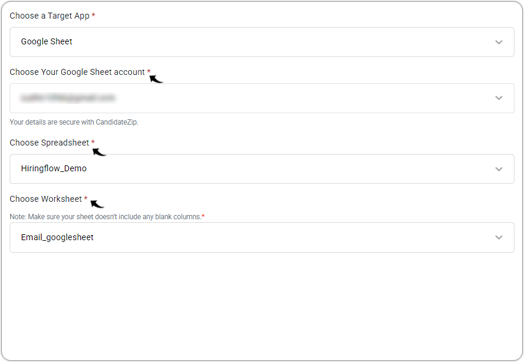
- Choose Your Google Sheet account: Your Gmail account will already be selected in this field, you can add a new account as necessary.
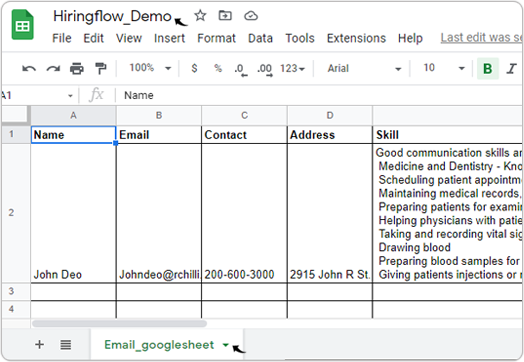
- Choose Spreadsheet: Select your google spreadsheet from the
drop-down.Note: Make sure you already created a google spreadsheet containing columns with the field name (such as Name, Email, Contact, Address, Skills, etc.) for which you want the details to be stored from the resume/JD. See the sample google spreadsheet with the field names at step-13.
- Choose Worksheet: Select your worksheet from the selected spreadsheet
from the drop-down.Note: Make sure that there is no blank column in the worksheet.
- On the Map Your Fields field, all your google spreadsheet columns will be
listed. Map the google spreadsheet fields with the candidatezip fields and click
Done.Note: If you update (add/delete column) your google spreadsheet, click Refresh fields to get the updated fields list for mapping.

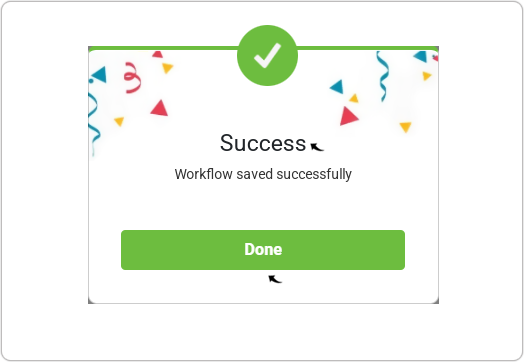
- A Success pop-up will be displayed once the workflow is created successfully.
Click Done on the Success pop-up.
- Click Existing Workflow on the left-side navigation panel to view all the
created workflows. You can do the following:
- Click
 icon to edit workflow as necessary.
 - Click
 icon to Active/Inactive the workflow as
necessary.
icon to Active/Inactive the workflow as
necessary. - Click
 icon to delete the workflow as necessary.
 - Click Create workflow to create a new workflow as necessary.
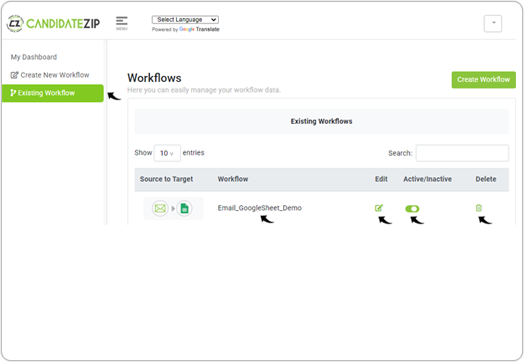
- Click
- Once the workflow is created successfully as per the above steps, and
the workflow is turned active, you can send emails to resumeparsing@candidatezip.com from the email that is set in the
workflow (see Step-2). The resume/JD in the email body/attachment will be parsed, and
the data will be automatically stored in the google sheets you selected in step-9. The process of
storing the parsed data in the google sheet from Gmail becomes autonomous.