Source App: Email Parsing + Target App: Zoho Recruit
This topic describe the procedure on how to create a hiring workflow using source app as email parsing and target app as Zoho Recruit.
- Once you click Create New Workflow in section Hiring Flow
Dashboard, fill the following fields as follows:
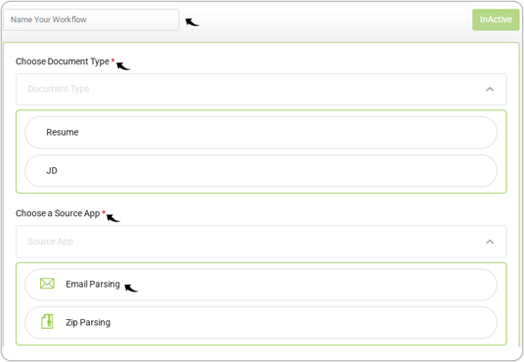
- Name Your Workflow: Enter the name for your workflow. The System would assign a name to the workflow if this field left blank.
- Choose Document Type: Choose Resume from the drop-down.Note: GreenHouse is not applicable for the JD parsing.
- Choose a Source App: Choose either Email Parsing or Zip
Parsing from the drop-down as necessary. In this case, select
Email Parsing.
- Once Email Parsing is selected in the above step, do as follows for
the following fields and click Continue.
- Choose Your Email account: Enter your email account.Note: One email account can be used only once to create a workflow. For each workflow, a unique email account is necessary. You can add multiple emails separated by comma or semi-colon.
- Choose Email Process Type: Select the email process type from the
drop-down.
- Attachment: If you select Attachment, then candidatezip will search resume/JD from the attachment of email only.
- Body: If you select Body, then candidatezip will search resume/JD from the email body only.
- Both: If you select Both, then candidatezip will
search resume/JD from the email body and attachment both.

- Choose Your Email account: Enter your email account.
- Forward the emails from where you want to send resume to resumeparsing@candidatezip.com and verify by clicking the checkbox and
then click Done.Note:
- To automate the forwarding of emails containing resumes to resumeparsing@candidatezip.com, you can update the email setting to forward a copy of all your emails to resumeparsing@candidatezip.com. See the Gmail setting on how to Automatically forward Gmail messages to another account. Also, if you want to forward emails containing only the resume, see how you can Create rules to filter your email.

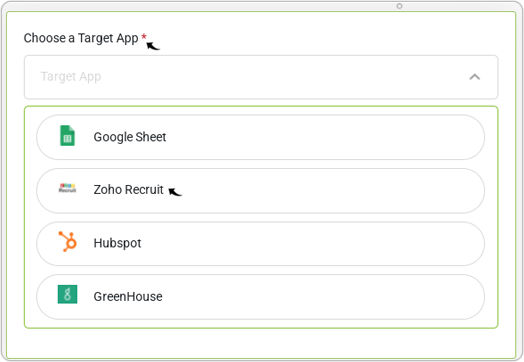
- Select Zoho Recruit as a target app for Choose a Target App
field.Note: If JD is selected in the above step, then the Zoho Recruit, Hubspot, and the GreenHouse are not applicable as a target app.
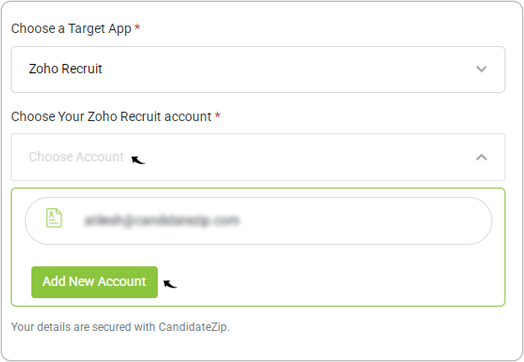
- Click Add New Account for the Choose your Zoho Recruit
account field.Note: Select existing Zoho account from the drop-down as necessary.
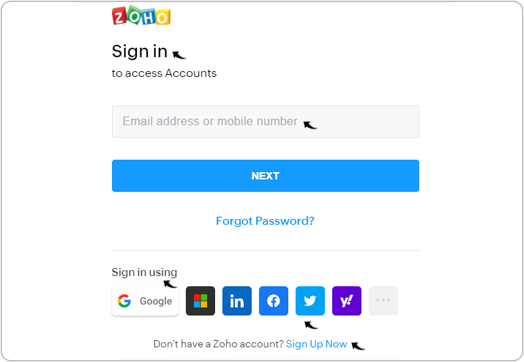
- Sign in to the Zoho account on the Zoho Sign in pop-up.Note:
- You can also sign in using a social account such as Gmail, LinkedIn, or other accounts as necessary.
- If you are new to Zoho, click Sign Up Now to register for a new account.
- On the Zoho pop-up, select CandidateZip Inc and click Submit.
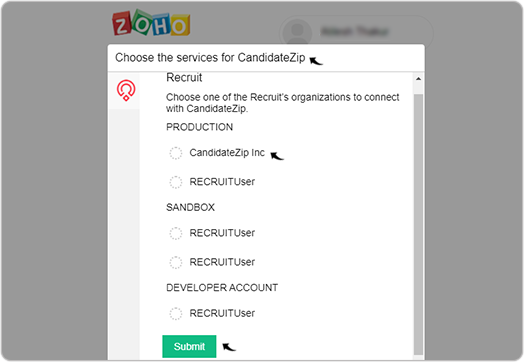
- Give access of the Zoho account to the CandidateZip and click Accept.

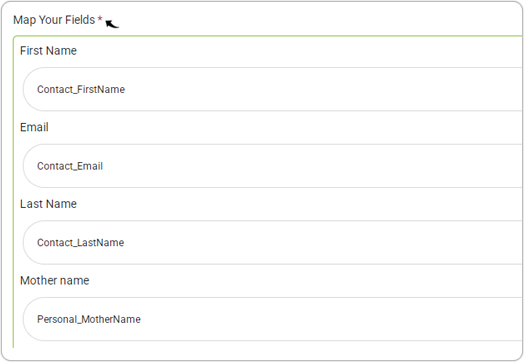
- Once the Zoho account is added successfully in step-5, map all
the Zoho fields as necessary with the relevant CandidateZip field in the Map Your
Fields section.Note: Mandatory fields are First name, Last name, and emails.
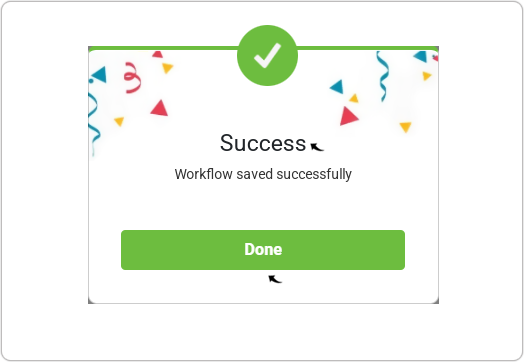
- A Success pop-up will be displayed once the workflow is created successfully.
Click Done on the Success pop-up.
- Click Existing Workflow on the left-side navigation panel to view the created
workflow. You can do the following:
- Click
 icon to edit workflow as necessary.
 - Click
 icon to Active/Inactive the workflow as
necessary.
icon to Active/Inactive the workflow as
necessary. - Click
 icon to delete the workflow as necessary.
 - Click Create workflow to create a new workflow as necessary.
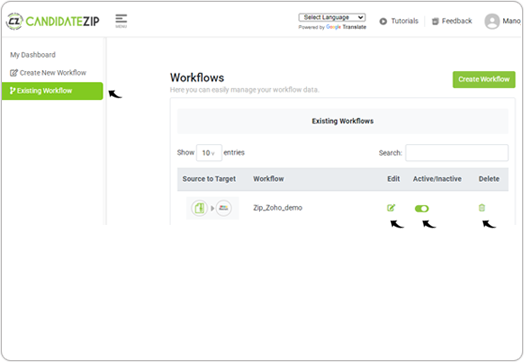
- Click
- Once the workflow is created successfully as per the above steps, and the workflow
is turned active, you can send emails to resumeparsing@candidatezip.com from the email that is set in the
workflow (see step-2). The resume/JD in the email body/attachment will be parsed, and
the data will be automatically stored in the Zoho account. The process of storing
the parsed data in the Zoho account from Gmail becomes autonomous.